You often do not need a full image editor just to make a photo smaller, change its format, fix its orientation, or reduce a PDF for an upload form. These are small focused jobs, and opening desktop software with dozens of panels for each one wastes time.
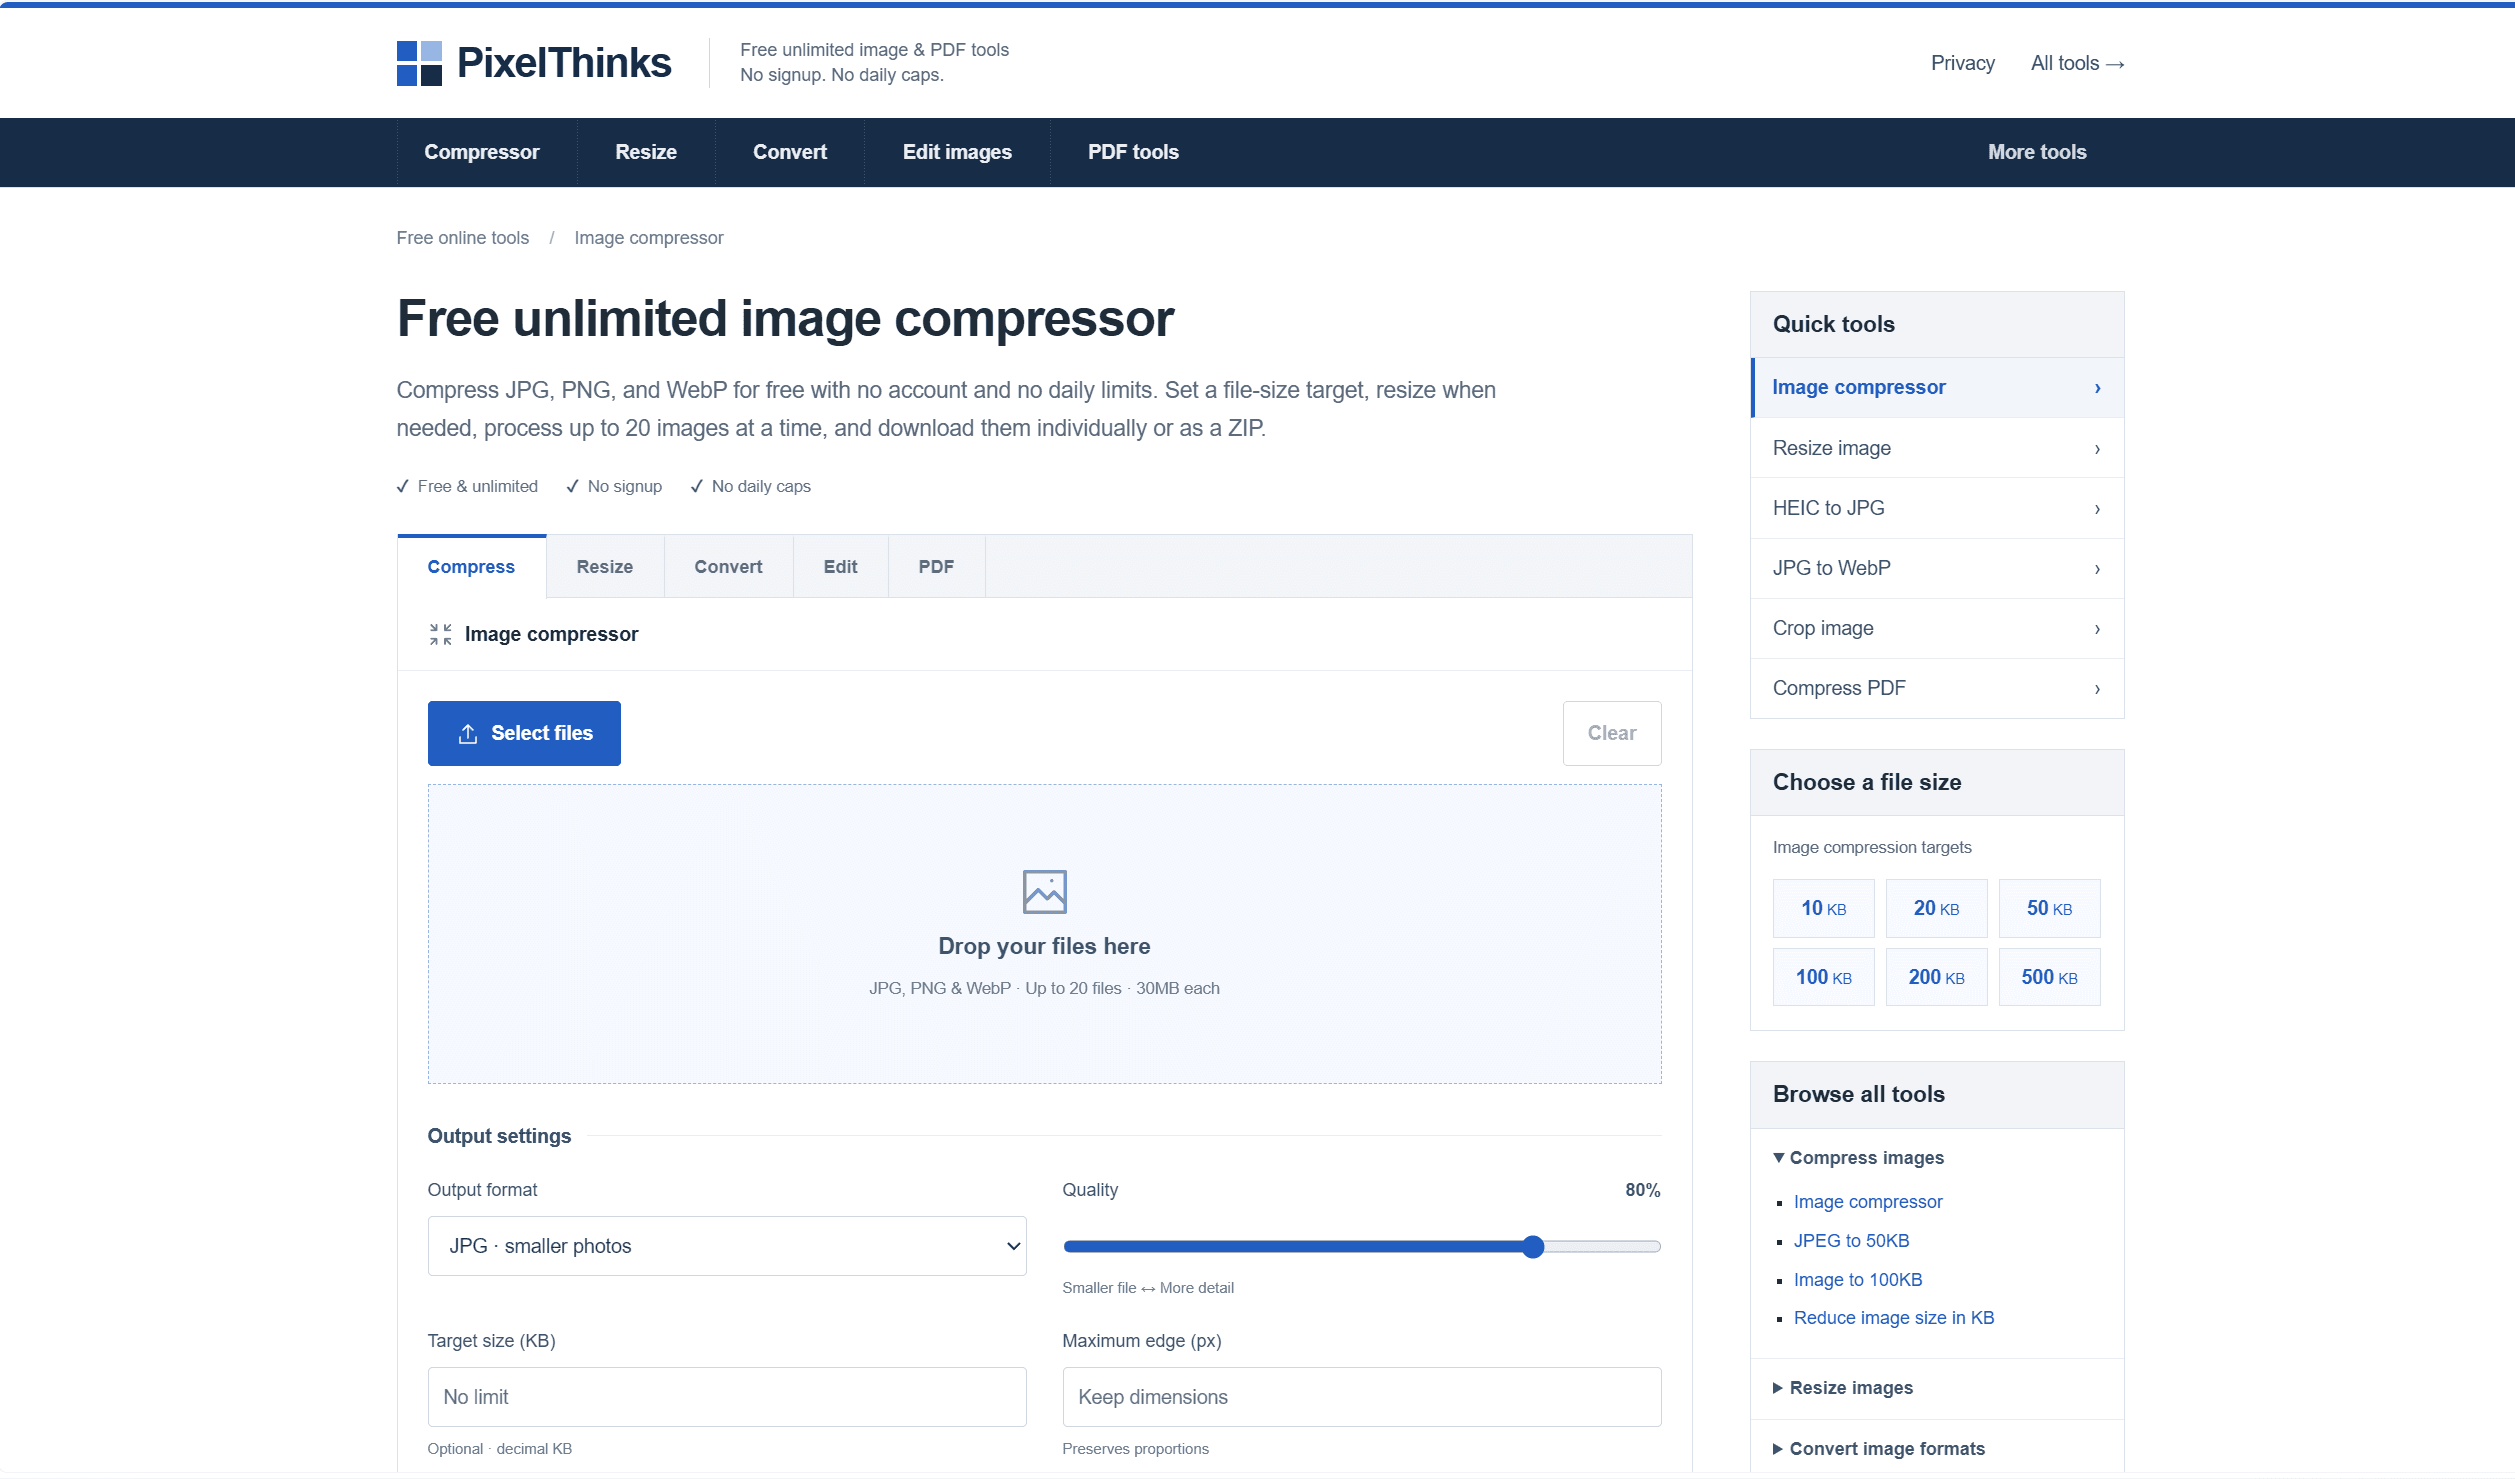
PixelThinks is a collection of browser-based tools for exactly these tasks: image compression, resizing, format conversion, basic editing, and PDF compression. No account, no daily caps, no software to install.
This guide covers what each category of tools does, which one fits which situation, and where the limits are.
What PixelThinks Is
PixelThinks is an online tool directory for image and PDF file tasks. The tools run in your browser and process files without sending them to a server. The main categories are:
- Image compression (reduce file size)
- Image resizing (change pixel dimensions)
- Format conversion (HEIC, AVIF, BMP, TIFF, GIF, WebP)
- Image editing (crop, rotate, blur, pixelate)
- PDF compression
- Smaller utilities (emoji to image, data URI decoding)
There are also preset pages for common size targets such as 50KB, 100KB, and 200KB for both images and PDFs. These are not separate features. They load the compressor with the target pre-filled so you skip the configuration step when you already know the limit.
1. Image Compression
The main compressor accepts JPG, PNG, and WebP files, up to 20 images at once, with each file up to 30MB. It gives you four settings to adjust:
- Output format. Choose JPG, WebP, or PNG for each batch.
- Quality. Controls the encoder setting for JPG and WebP. PNG is always lossless, so its quality slider is disabled.
- Target size in KB. An optional ceiling. The tool finds the right quality setting automatically rather than requiring you to guess and re-download.
- Maximum edge in pixels. Limits the longer dimension if dimensions also need to shrink.
The target size is a ceiling, not a floor. If a photo is already under the limit, the tool returns the original without re-encoding it. Re-encoding an already-compressed file at the same quality typically makes it slightly larger, so skipping is the right call.
Target size vs quality slider
Moving the quality slider and downloading to check the size is slow. When you know the exact limit, such as a government portal requiring an image under 100KB, Target Size is better. The tool iterates over quality settings in your browser until it finds the highest quality that stays within the limit, then shows you the result before the download button appears.
If quality compression alone cannot reach a very tight target, the tool also scales down the dimensions and tries again. The result panel always shows the final width, height, and file size so you can see what changed.
Preset size pages
PixelThinks has dedicated pages for compressing images to 10KB, 20KB, 50KB, 100KB, 150KB, 200KB, 300KB, and 500KB targets. The same presets exist for PDF files. These are useful shortcuts when you already know the requirement and want to skip the settings screen.
Need a simpler single-image compressor?
The Boardmarks image compressor compresses one JPG, PNG, or WebP to any KB or MB target in your browser. No upload, no account. The download only appears after the output is confirmed under your limit.
2. Image Resizing
Resizing and compression are related but separate problems. Compression reduces how much storage the pixel data uses. Resizing reduces how many pixels there are. A 3000 by 2000 photo can be compressed to a smaller file without changing those numbers. Reducing it to 1500 by 1000 pixels through resizing will also cut the file size, but the two operations control different things.
PixelThinks lets you resize by entering width, height, a percentage, or a physical measurement in centimeters, millimeters, or inches.
Contain, Cover, and Stretch
When you specify both a width and height, you have three ways to fit the image:
- Contain keeps the whole image visible inside the box. If the aspect ratios differ, space appears around the image.
- Cover fills the box entirely and crops anything that falls outside it.
- Stretch forces the image into the exact dimensions, which will distort it if the proportions are different.
For profile photos and product images, cropping before resizing usually gives better results than relying on an automatic centered crop.
Physical dimensions and DPI
Print and document forms sometimes specify sizes in centimeters, millimeters, or inches. PixelThinks calculates the pixel count for a physical dimension using a DPI value, but it does not embed that DPI into the downloaded file. The pixel count in the output is what matters for printing purposes, not a stored DPI value. Verify the resulting dimensions match what the print service or form requires.
The tool also includes shortcuts for common dimensions: 600 by 600 pixels, 3.5 by 4.5 cm, 3 by 4 cm, 2 by 2 inches, and 4 by 6 inches.
3. Format Conversion
Format conversion and compression are different jobs. Changing an image from HEIC to JPG does not automatically make it smaller. If you also need a strict file-size limit, convert first and then compress the result.
HEIC to JPG
HEIC is the default format for photos taken on Apple devices, but many upload portals and older applications only accept JPG. The HEIC converter on PixelThinks accepts up to 20 files, lets you set the JPEG quality, and produces a separate JPG copy for each. The original HEIC file is not modified.
Converting to JPEG does not preserve HEIC-specific features or all metadata. Keep the original if you may need the full image data later.
Other format conversions
PixelThinks also handles:
- AVIF to JPG
- JPG to WebP
- BMP to JPG
- TIFF to JPG
- GIF to JPG
GIF to JPG produces a still image from the first frame. Multi-page TIFF files produce only the first page. For HEIC, AVIF, and other formats the main compressor does not accept directly, convert first, then compress.
4. Image Editing Tools
Crop
The crop tool removes part of the image by selecting an area to keep. Cropping is useful before resizing when the subject is off-center and you want to control what the resize operation keeps. It is also the right tool when you need to reframe a photo, remove an unwanted edge, or create a square composition for a profile picture.
Rotate
A dedicated rotate tool handles orientation corrections without opening a full editor. This covers photos that arrive rotated from the camera, scanned pages that were placed sideways, or images that need to be turned before uploading.
Blur and Pixelate a Selected Area
Both tools let you select part of an image and obscure it. Blur smooths the selected area to look out of focus. Pixelation replaces it with large solid-color blocks.
Common uses include hiding names and account details in screenshots, obscuring faces in photos, and covering private information in document images before sharing them.
A note worth keeping in mind: visual redaction through blur or pixelation is an image edit. It is not the same as cryptographic redaction or secure document handling. For highly sensitive information, that distinction matters.
5. PDF Compression
The PDF compressor accepts files up to 30MB and offers two modes:
- Structure optimization compresses the existing PDF structure while keeping text, links, form fields, and other document features intact. This is the safer option for most PDFs.
- Scan compression renders each page as an image and rebuilds the PDF from those images. This can reduce file size for image-heavy scanned documents but removes selectable text, links, form fields, digital signatures, layers, and tags. It is limited to 20 pages.
Password-protected PDFs are not supported. Keep the original before compressing, especially if using scan compression, because the document features removed in that mode cannot be recovered from the output.
Size presets for PDFs follow the same pattern as image presets: 10KB, 20KB, 50KB, 100KB, 150KB, 200KB, 300KB, and 500KB pages load the compressor with the target already filled in.
6. Smaller Utilities
Emoji to Image
This tool converts an emoji character into an image file. It is useful when you need an emoji as a standalone graphic for a thumbnail, icon, slide, or other visual asset rather than as a text character in a document.
Data URI to Image
Developers sometimes encounter images embedded directly in HTML or API output as a Data URI string. This utility converts that encoded text back into a downloadable image file. It saves the step of manually decoding the base64 string when you need to inspect or use the image separately.
Which Tool to Use for Each Task
| What you need | PixelThinks tool |
|---|---|
| Make a JPG, PNG, or WebP smaller | Image Compressor |
| Get an image below a fixed KB limit | Target Size Compression |
| Change pixel width and height | Image Resizer |
| Fit an image into exact dimensions | Resize with Contain, Cover, or Stretch |
| Prepare a photo for print (CM, MM, or inches) | Physical Size Resizer |
| Open an iPhone photo in JPG-only software | HEIC to JPG |
| Change AVIF, BMP, TIFF, or GIF to JPG | Image Converters |
| Create a WebP file | JPG to WebP |
| Remove part of an image | Crop Image |
| Fix image orientation | Rotate Image |
| Hide part of a screenshot or photo | Blur or Pixelate Area |
| Reduce PDF file size | PDF Compressor |
| Reach a specific PDF KB limit | Target Size PDF Compression |
| Save an emoji as an image file | Emoji to Image |
| Decode an image embedded as text in code | Data URI to Image |
Compression, Resizing, and Conversion: Using Them Together
A single file task sometimes requires more than one operation. Suppose an upload portal requires a 600 by 600 JPG under 100KB, and your source file is a large HEIC photo from an iPhone.
A sensible order would be:
- Convert the HEIC photo to JPG.
- Crop it if the framing needs adjustment.
- Resize it to 600 by 600 pixels.
- Compress the result to stay under 100KB.
- Check the final dimensions, file size, and image quality before uploading.
Using each tool for one step keeps the result easier to control than trying to do everything in a single pass. It also means you can work from the same clean source if you need to adjust one step without redoing the others.
Batch Processing
The image compressor, resizer, and most converters support batches of up to 20 files, each up to 30MB. Results download individually or as a ZIP.
One thing to know about batch compression with a target size: the target applies to each image separately, not to the combined total. If you are preparing a set of files for an email with a total attachment limit, check the sum of the individual compressed file sizes before sending.
Check the Result Before You Use It
Whatever tool you use, verify the output before replacing your original or uploading anywhere. Things to check:
- File size (bytes, not just KB estimate)
- Pixel width and height
- Image quality at the size you will display it
- Cropping and framing
- Transparency (open on both light and dark backgrounds if it matters)
- File format and extension
For PDFs, also check that text is selectable, links work, and form fields or signatures are intact if those were present in the original.
Keep the original file until you are satisfied with the result. Compressed and converted files lose information that cannot be recovered by going back to a higher quality setting.
Frequently Asked Questions
- Is PixelThinks free and unlimited?
- The tools on PixelThinks are free to use with no account and no stated daily usage quota. Individual operations still have technical limits: image batches accept up to 20 files of up to 30MB each, and the PDF compressor takes one file up to 30MB. "Unlimited" means there is no daily cap on the number of sessions, not that every operation has infinite capacity.
- Do I need to create an account to use PixelThinks?
- No. You can open any tool on PixelThinks and start processing files without signing up or providing an email address.
- What is the difference between image compression and resizing?
- Compression changes how efficiently the pixel data is stored, reducing file size without necessarily changing the number of pixels. Resizing changes the actual pixel dimensions: width and height. A photo at 3000 by 2000 pixels can be compressed to several different file sizes. Reducing it to 1500 by 1000 pixels through resizing will also tend to reduce file size, but the two operations control different things.
- When should I use Target Size compression instead of the quality slider?
- Use the Target Size option whenever a form, portal, or email limit specifies a maximum file size in KB. If you adjust the quality slider instead, you need to download the result and manually check whether it fits. Target Size automates that check: you enter the limit, and the tool finds the right quality setting itself.
- Can I compress a PNG below a KB limit without losing transparency?
- PNG uses lossless encoding, so quality compression alone cannot reduce it to a tight target. To meet a strict KB limit with transparency, set the output format to WebP, which supports transparency with lossy encoding. If the destination requires PNG specifically, the tool may need to reduce image dimensions to reach a very tight target.
- Does converting HEIC to JPG delete the original file?
- No. Converting an HEIC photo creates a separate JPG copy. The original file on your device is not modified or deleted. PixelThinks recommends keeping the original in case you need the full metadata or quality later.
- What is the difference between blur and pixelation for redacting images?
- Blur smooths the selected area, making it appear out of focus. Pixelation replaces the area with large solid-color blocks. Both obscure content visually, but neither is a secure redaction method for sensitive documents. Use either based on which visual treatment suits the image.
- Which PDF compression mode should I use?
- Structure optimization is safer: it tries to compress the existing PDF structure while keeping text, links, and form fields. Scan compression renders pages as images and rebuilds the PDF, which can make scanned documents smaller but removes selectable text, links, form fields, and digital signatures. Use scan compression only when you are sure those features are not needed and always keep the original.
- Will re-compressing an already compressed image make it worse?
- Yes. Each round of JPEG or WebP compression stacks damage from the previous one. Removed detail cannot be recovered by re-encoding at a higher quality setting. When trying a different target size, upload the original file again rather than re-compressing the version you already downloaded.
- When should I compress versus resize an image?
- Compress when the file is too large for an upload form or an email attachment, but the pixel dimensions are already correct. Resize when you need the image to fit a specific pixel width and height. When you need both a particular size limit and particular dimensions, resize first and then compress the result.
Final Thoughts
PixelThinks covers the small image and PDF jobs that otherwise send people to multiple different websites. Compression, resizing, format conversion, basic editing, and PDF compression are all there without needing an account or hitting daily limits.
The many size-specific preset pages are easier to understand once you know they are all shortcuts to the same compressor. If you know your limit, go to the preset. If you need more control over quality, format, and dimensions together, use the main compressor.
The simplest way to pick a tool is to identify the actual problem: file size, pixel dimensions, file format, or image content. Each category on the site maps to one of those four things.
Related
Chrome New Tab extension
Organize bookmarks, todos, and habits on every New Tab.
- Visual bookmark boards
- Todos, habits, notes, reminders
- Local-first by default
7-day free trial. No card required.