A form rejects your photo. An email bounces with an attachment too large. A visa portal says the file must be under 100 KB. The problem is always the same: you need a specific file size, not just a smaller file.
This guide explains how to compress an image to an exact size in KB or MB, what happens to quality as you go smaller, when dimensions need to change as well, and which format to use depending on where the image is going.
Compress Image to KB: How to Do It
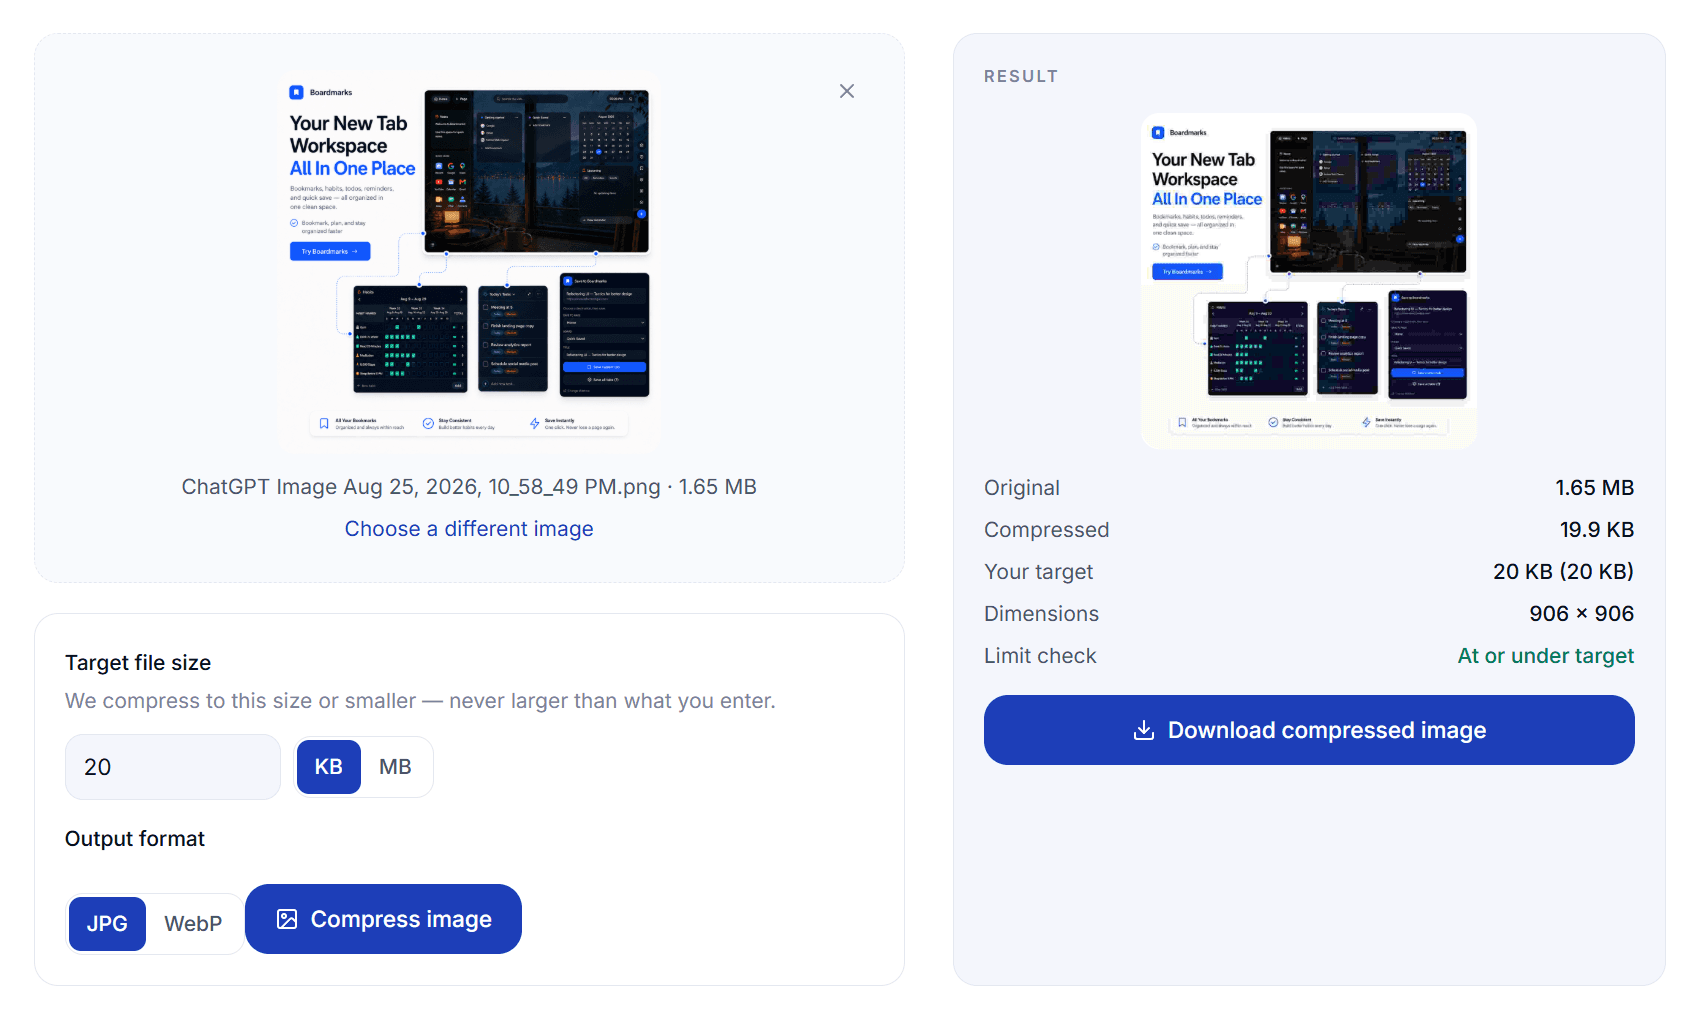
Use the free image compressor on this site. It runs inside your browser tab and never uploads your file to a server, so it works with sensitive documents too.
- Upload your image. Drag a JPG, PNG, or WebP into the upload area, or click to browse. The original file size appears straight away.
- Type the target size. Enter the number the form or email limit requires. Switch the unit between KB and MB. Decimals work: 1.5 MB is fine.
- Choose JPG or WebP, then compress. Use JPG for government forms, portals, and anything that lists accepted formats. Use WebP for website images where you control the destination.
- Check the result and download. The result panel shows original size, compressed size, final dimensions, and a green confirmation that the output is at or under your target. The download button only appears after that check passes.
Why This Produces an Exact Result
Most compression tools give you a quality slider. You pick 70%, download the result, and check the size. If it is still too large you drag the slider again. That guessing loop is what this tool removes.
When you press Compress, the tool runs a binary search over the quality range. It encodes the image at the midpoint, measures the file size, and narrows the range in the right direction. After about a dozen passes it finds the highest quality setting that keeps the output strictly under your target. Those passes happen in memory in your browser, so it typically takes under two seconds.
If quality alone is not enough, the tool draws the image at 85 percent of its current dimensions and runs the quality search again. This continues until the target is met. That is why the result panel reports dimensions alongside file size: you can see whether the pixel count changed.
The output is checked one final time before the download button appears. If it exceeds your limit for any reason, the button does not show and you get an error instead.
What Happens to Quality as You Go Smaller
JPEG and WebP compression is lossy. Reducing file size means removing information your eye is less likely to notice. At larger targets the difference is usually invisible at normal screen sizes. At smaller ones it becomes apparent.
A rough guide for typical photos of people or places:
- Above 200 KB: Compression artifacts are almost never visible at screen resolution.
- 100 to 200 KB: Usually clean. Inspect fine details if precision matters.
- 50 to 100 KB: Acceptable for most casual uses. Some softness on hair, fabric, and background gradients.
- 20 to 50 KB: Visible quality loss. Faces remain recognizable. Not suitable for print or anything zoomed in.
- Below 20 KB: Noticeable blocking and color banding. The tool may also reduce dimensions to reach the target.
Screenshots and images with small text compress worse than photographs, because compression blurs exactly the sharp edges that make text readable. If you need a screenshot at a tight size limit, expect visible damage at smaller numbers.
Portraits compress better than landscapes because soft edges around a face are less noticeable than soft edges in detailed architecture or foliage. If you have a choice, crop to the relevant subject before compressing.
JPG or WebP: Which One to Use
Both formats use lossy encoding and produce similar results at comparable quality settings. The difference is acceptance and efficiency.
Use JPG when you are uploading to a government portal, a job site, an older content management system, or any service that lists accepted formats. JPG is accepted almost everywhere. If a form says “JPG only” and you upload a WebP, it will usually fail silently or with a confusing error.
Use WebP when you control the destination and file size is tight. WebP typically produces files around 25 to 30 percent smaller than JPG at the same visual quality, which matters when your target is under 100 KB. Modern browsers, content delivery networks, and most hosting platforms handle WebP without issues.
When in doubt and the destination is unknown, use JPG.
Common File Size Requirements
The number varies widely by use case. If a portal or email specifies a limit, use that number exactly. If nobody told you, the table below is a useful starting point.
| Use | Typical target | Format | Notes |
|---|---|---|---|
| Passport or visa portal | 20 to 200 KB | JPG | Check the portal instructions for the exact limit. Some also specify minimum dimensions. |
| Job application photo | 100 to 500 KB | JPG | JPG is safest with older hiring systems. Many portals state the limit on the upload step. |
| Email attachment | Under 1 MB | JPG or WebP | A thread with several photos attached adds up. Keep each one under 500 KB where possible. |
| Website hero or feature image | 100 to 300 KB | WebP | Affects page load speed. WebP gives better quality at the same size for web delivery. |
| Blog or article image | 60 to 150 KB | WebP | Inline images are displayed small. Keeping them light adds up across a whole post. |
| E-commerce product photo | 80 to 200 KB | WebP or JPG | Small enough to load fast on mobile, large enough to zoom into product details. |
| Profile picture or avatar | 30 to 100 KB | JPG or WebP | Displayed at small sizes. Very tight limits are fine for most portrait photos. |
| WhatsApp or Telegram photo | Under 1 MB | JPG | Apps auto-compress above their threshold. Compress first and control the quality yourself. |
Tips for a Better Result
Set the highest target you are allowed
If the limit is 200 KB, compress to 190 or 200, not to 50. Every KB lower than necessary costs quality you did not have to spend. The goal is to pass the check, not to produce the smallest possible file.
Crop before compressing
If you need a face photo at 30 KB, crop to the face first. A full-scene photo at 30 KB loses more visible detail than a tightly cropped portrait at the same size, because there is more information to discard.
Always keep the original
Compression removes information that cannot be recovered. The compressed file is for the specific use that required a small size. Keep the original at full quality for any future use that needs it. The compressed download uses a -compressed suffix so it does not overwrite the source.
Work from the original, not a previous compress
Each round of JPEG or WebP compression stacks the damage from the previous one. If you want to try a different target, upload the original again rather than re-compressing the version you downloaded last time.
Screenshots need more room
A photo of a person at 50 KB can look fine. A screenshot with small text at 50 KB often looks unreadable. Text, lines, and high-contrast edges are exactly what lossy compression damages most. Give screenshots a higher target if the content needs to remain legible.
Your Images Stay in Your Browser
The compressor runs entirely inside your browser tab using the Canvas API. Your image is read from your disk, processed in memory, and written back to your disk. It is never sent to our servers or to any third party.
That matters when compressing documents you would not send to a random website: passport scans, medical images, signed contracts, salary slips. The browser does the work. We never receive the file.
One side effect of re-encoding in the browser: the output file carries no EXIF metadata. Camera model, GPS coordinates, and timestamps are gone. That is usually a benefit if you are sharing the image publicly.
Try the compressor
Upload a photo, type the size you need, and download a file that never exceeds your target.
Open image compressorFree. No account. Nothing is uploaded.
Frequently Asked Questions
- How do I compress an image to an exact size in KB?
- Upload the image, type the KB number you need, and compress. The tool uses a binary search on the encoding quality to find the highest quality setting that still produces a file at or under your limit. It checks the result before showing the download button, so the file you get will never exceed the size you entered.
- What is the difference between compressing and resizing an image?
- Compressing changes how efficiently the pixels are encoded without necessarily changing how many pixels there are. Resizing changes the actual pixel count: width and height. A 3000 by 2000 photo can be compressed to various file sizes without changing those numbers. Reducing the pixel count to 1500 by 1000 through resizing also tends to reduce file size, but the two settings control different things. Use a target KB first; the tool reduces dimensions only when quality compression alone cannot reach the limit.
- Why does the tool sometimes reduce my image dimensions?
- At very low targets the math runs out. A 10 MB photo contains too much information to fit inside 20 KB without also reducing the number of pixels. The tool tries quality compression first. If no quality setting is low enough to reach the target, it redraws the image at 85 percent of its current dimensions and tries again. The result panel always shows the final width and height.
- What size should I set for a passport or visa photo?
- Follow the exact number on the portal or instructions. Common requirements range from 20 KB to 200 KB, and some portals enforce the limit silently with no error message when you exceed it. Check whether the portal also specifies a minimum size, since compressing too far can drop you below that floor.
- Should I use JPG or WebP?
- JPG for anything going to a government form, an older company system, or any portal that shows a list of accepted formats. WebP for website images where you control the destination, since it typically produces a smaller file at the same visual quality. When unsure, JPG is the safer choice because it is accepted almost everywhere.
- Will the compressed image look noticeably worse?
- At targets above 100 KB for a typical photo the difference is usually invisible at normal screen sizes. Below 50 KB quality starts to drop, and below 20 KB most photos show softness and blocking, especially around text and sharp edges. Portraits compress better than screenshots because faces tolerate soft edges more than small characters do.
- Does compression reduce image quality permanently?
- Yes. JPEG and WebP compression is lossy, meaning removed detail cannot be recovered. That is why keeping the original file matters. The compressed version is for the specific use that required a small size; the original stays intact for any future use that needs better quality.
- Is the tool free and does it upload my photos?
- It is free with no account required. Compression runs entirely inside your browser using the Canvas API. Your image is never sent to a server, which also means it works with sensitive documents like identity papers and medical scans.
- Can I compress several images at once?
- The current tool on this page handles one image at a time. Process each one separately, then check the result before downloading. This keeps the focus on getting each file right rather than batching through a queue and finding problems later.
- What if my image is already smaller than the target?
- The tool returns the image as-is without re-encoding. Re-encoding an already-compressed file at the same quality usually makes it slightly larger or accumulates artifacts. If the file already fits, downloading the original is the right answer.
Final Thoughts
The right approach is to start with the number the receiving system requires and work backwards from there, rather than picking a quality setting and guessing whether the output is small enough.
Set the highest target you are allowed. Choose JPG unless you have a specific reason for WebP. Keep the original. If the result looks worse than expected, crop the image tighter before compressing rather than raising the quality and exceeding the limit.
The tool on this page handles the search automatically. You tell it the size, it finds the quality. The download only appears when the check passes.
Related
Chrome New Tab extension
Organize bookmarks, todos, and habits on every New Tab.
- Visual bookmark boards
- Todos, habits, notes, reminders
- Local-first by default
7-day free trial. No card required.